
Building a Passwordless Authentication Library for Umbraco — Part 3: Magic Links
Welcome to Part 3. In Part 1 we covered the overall library design, and in Part 2 I walked through the Core package and the shared components it provides. Now we get to the fun part: actually signing people in.
Magic links are the simplest of the three passwordless methods in this suite. The concept is straightforward: a member enters their email, you send them a signed link, they click it, they're in. No passwords, no codes to copy, just a click. But as with most "simple" auth concepts, the implementation details are where things get interesting.
How Magic Links Work (Conceptually)
The flow has two phases: request and verify.
sequenceDiagram
    participant M as Member
    participant S as Your Site
    participant E as Email

    M->>S: POST /auth/magic-link/request (email)
    S->>S: Rate limit check
    S->>S: Look up member by email
    S->>S: Generate signed token
    S->>E: Send email with signed link
    S-->>M: 202 Accepted (always)

    M->>E: Open email, click link
    M->>S: GET /auth/magic-link/verify?token=...&email=...
    S->>S: Rate limit check
    S->>S: Look up member by email
    S->>S: Mark token as used (single-use check)
    S->>S: Verify token signature + expiry
    S->>S: Sign in, rotate security stamp
    S-->>M: Redirect to return URL
Notice that the request phase always returns 202 Accepted, regardless of whether the email is registered or not. Can you guess why?.
Tokens Via ASP.NET Core Identity
Rather than rolling my own token generation, I use ASP.NET Core Identity's existing UserManager<T> token provider. This gives me the ability to have:
- Tokens tied to a specific user and purpose
- Built-in expiry validation
- Token signing using the Data Protection API (keys managed by ASP.NET Core)
The MagicLinkTokenProvider implements IUserTwoFactorTokenProvider<MemberIdentityUser>:
public class MagicLinkTokenProvider : IUserTwoFactorTokenProvider<MemberIdentityUser>
{
    public Task<string> GenerateAsync(string purpose, UserManager<MemberIdentityUser> manager,
        MemberIdentityUser user)
    {
        return manager.GenerateUserTokenAsync(user, TokenProviderNames.MagicLink, purpose);
    }

    public Task<bool> ValidateAsync(string purpose, string token,
        UserManager<MemberIdentityUser> manager, MemberIdentityUser user)
    {
        return manager.VerifyUserTokenAsync(user, TokenProviderNames.MagicLink, purpose, token);
    }
}
The purpose string combines the authentication reason with the member's email address, which means a magic link generated for one email address cannot be used to sign in as a different email address, even if someone managed to steal the token value itself.
Tokens are generated on the request phase (server side), included in the email link as a query parameter, and verified on the callback side. The Data Protection API handles all the cryptography.
Single-Use Enforcement
By default, magic links are single-use; once a token has been clicked and successfully verified, any subsequent attempt to use the same token is rejected. This prevents replay attacks where someone intercepts the link from email logs or a browser history and uses it later.
The ISingleUseTokenStore from Core handles this. Before verifying the Identity token, the controller hashes the raw token value and tries to mark it as used:
var tokenHash = SHA256.HashData(Encoding.UTF8.GetBytes(model.Token));
var tokenHashString = Convert.ToHexString(tokenHash);

var isFirstUse = await _tokenStore.TryMarkUsedAsync(tokenHashString, tokenLifespan);
if (!isFirstUse)
{
    await FakeWork.DelayAsync(_options.FakeWorkBudget, ct);
    return Unauthorized();
}
The hash (not the raw token) is stored in the token store. This is important, so that if your token store were ever compromised, an attacker would find hashes, not usable tokens.
Single-use can be disabled via configuration if you have a specific scenario where it's not appropriate, but I'd strongly recommend leaving it on, I've also not tested if it does disable correctly.
Protecting Against Email Enumeration
Right, so I asked you earlier if you knew why we always returned 202 Accepted, did you get the answer right?
Here's the thing about authentication forms: every time you return a different response based on whether an email address is registered, you're leaking information. An attacker can automate requests with thousands of email addresses and build a list of which ones have accounts on your site. This is called email enumeration and it's genuinely bad and it turns your login form into a data harvesting tool.
The protection is simple: always return the same response. The request endpoint always returns 202 Accepted:
var member = await _lookup.FindApprovedAsync(model.Email);

if (member is null)
{
    await FakeWork.DelayAsync(_options.FakeWorkBudget, ct);
    return Accepted();  // same response, no email sent
}

// ... generate token, send email ...
return Accepted();  // same response, email sent
Both branches return 202. The fake-work delay (more on this in Part 6) ensures the response takes roughly the same amount of time regardless of which branch was taken. From the outside, there's no way to tell whether your email is registered or not.
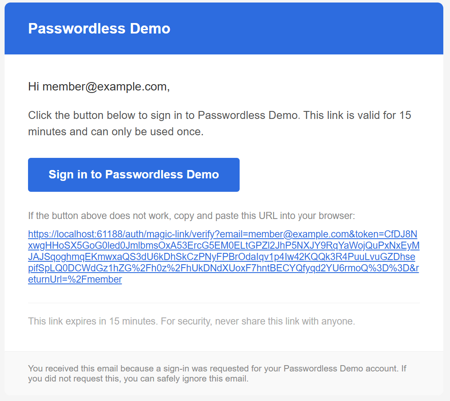
Email Templates
Default email templates ship inside the package as Razor views. I wanted them to be usable out of the box,no configuration required, but also easy to override if you need branded templates.
This is done using the standard Razor view resolution order. Templates live at Views/Emails/Passwordless/MagicLink.cshtml inside the package's RCL (Razor Class Library). If a host project places a file at the same path under its own Views/ folder, ASP.NET Core's view engine will find that one first.
The model passed to the template contains everything you'd typically need:
public record MagicLinkEmailModel(
    string MemberName,
    string MagicLinkUrl,
    TimeSpan TokenLifespan,
    string SiteName,
    string? LogoUrl
);
The default template is deliberately minimal, clean HTML with no heavy styling, just the link and some basic context. Host projects can override it completely by dropping their own template in the right place, no configuration needed, no interface to implement.
Configuration
The magic link-specific configuration sits under HCS:Authentication:MagicLink:
{
  "HCS": {
    "Authentication": {
      "LoginPath": "/login",
      "MagicLink": {
        "Enabled": true,
        "TokenLifespan": "00:15:00",
        "SingleUse": true
      }
    }
  }
}
TokenLifespan controls how long the link is valid. Fifteen minutes is the default — long enough that someone on a slow mobile connection isn't going to have it expire on them, short enough that an intercepted link has a small useful window. You can tune this to suit your use case.
What This Series Will Cover
- [Part 1] Why I built this, what's in the box, and how it fits together
- [Part 2] The Core package — designing for extensibility
- [Part 3] Magic Links — token providers, single-use enforcement, and email templates (you're here)
- [Part 4] Email OTP — code generation, attempt counters, and the multi-node problem
- [Part 5] WebAuthn/Passkeys — registration and sign-in ceremonies, credential storage
- [Part 6] Security under the hood — timing attacks, constant-time comparison, rate limiting atomicity
That's the magic link add-on covered. It's the simplest of the three methods and a good one to start with if you're new to passwordless. In Part 4 I'll move on to email OTP, which looks similar on the surface but had some different implementation challenges, particularly around attempt limiting and multi-node deployments.
If anything here raised questions, feel free to reach out — I'm on the Umbraco Discord as Nik, on Mastodon, or on X.